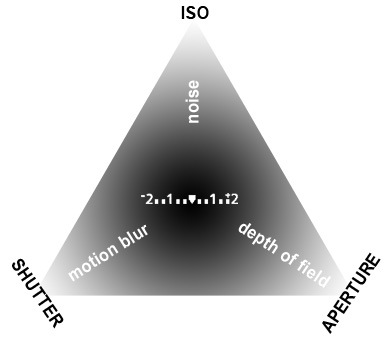
 The Shutter has been documented in a previous post which can be refered to for a quick re-cap.
The Aperture; a hole in the lens the diameter of which is controlled through f numbers or f stops.
The smaller the f number the larger the diameter, and vice versa.
First and foremost the Aperture controls the amount of light entering the camera; the larger the aperture the more light and vice versa.
The other use is its creative application. The key word is 'Focus', the larger the aperture the shorter the depth of focus otherwise known as Depth of Field (DoF), the smaller the aperture the longer the depth of field.
The largest aperture you can achieve is normally using e.g. f1.8, the smallest is achieved using e.g. f22, the standard scale goes something like this:
1.8, 2.8, 4, 5.6, 8, 11, 16, 22, each step is referred to a stop, changing the f5.6 to f8 would be one stop, f8 to f4 would be two stops. Each stop increases the light by double or decreases by half.

Image form dpreview
For more indepth information regarding the Aperture try dpreview
ISO is the term used to refer to the sensitivity of the sensor to light. In old school terms it was used to describe the emulsion of the film, the larger the grain structure the more receptive to light it was. The creative effect was a grainy image.
With digital the word grain has been swapped for 'Noise' and refers to the pixels that become apparent the higher the sensor is set.
In low light the ISO function permits more light in to the camera and if we refer to the Exposure triangle by making this adjustment will allow you to access faster shutter speeds or a smaller aperture.
A word of warning; 'Noise' is not as aesthetically pleasing as 'Grain', it often means red and green pixels randomly filling the shadow ares/s of your image.
Finally you can put all three together.
Exposure
Now you know the basics of using the different exposure modes you can work in 'M' mode - you are free!
First and foremost each exposure mode allows you to control the level of light entering the camera and therefore the brightness of your image. So in manual mode your first job is to get the correct level of light for the image you want to create.
Use the in built light meter.
 On a Nikon D60 it looks like the image shown left, taken from dpreview. The graphic below the shutter speed and aperture has a zero at the centre and a '+' and '-' at either end, this is your meter reading.
The marks in between refer to stops as we discussed earlier.
The bold mark denotes a full stop and the smaller marks denote a third of a stop. The graphic shows 2 stops but if the plus or minus is flashing then you are more than 2 stops too dark or light, otherwise referred to under or over exposed. In most situations you will want to have just one vertical mark below the zero to get the best possible exposure, you will do this by adjusting the shutter speed, aperture and/or ISO, what you choose is explained next.
Priority Setting
You want to "Zero" your light reading, as I have referred to it. In some situations you may not have much choice other than to adjust all three modes in order to alter the light reading from too little light or too much light. But in most situations the adjustment you make is based on the creative effect you want to achieve.
The Shutter allows you to freeze movement or create motion blur. To achieve such an effect, in most cases, will involve letting less light in (e.g. 1/2000 to freeze movement) or letting lots of light in (e.g. 1" to create motion blur). Either of these setting will have a dramatic affect on the brightness of your image so you will need to compensate by adjusting the aperture and/or ISO.
More light into the camera may mean balancing the levels of light by stopping down the aperture.
For example - the following setting is 2 stops too dark - 1/1000 / f5.6 / 100
By adjusting the aperture setting from 5.6 to 2.8 will balance the brightness of your image and allow you to maintain a fast shutter speed.
The same is true of the aperture. If your priority is to affect the focus of the image then you may need to balance the brightness of your image by using the shutter and/or the ISO.
For example - 1/500 / f22 / 100 is 2 stops too dark but by adjusting the shutter speed to 1/125 lets the correct level of light into the camera and maintains a small aperture to achieve the creative effect of a long depth of field.
So, first and foremost get the light right but in doing so make the adjustment to create the effect you want to achieve.
Shutter Speed Freezes Movement, or creates Motion Blur, the Aperture affects the Focus and the ISO creates Noise.
Phew! Be sure and post a question if you need greater clarity.

No comments:
Post a Comment